Everybot Chassis
This section of the documentation is intended to aid teams that have little or no experience with the Kit of Parts chassis or those that are having problems following the AndyMark instructions.
Chassis Type
The AndyMark AM14U6 chassis is part of the Kit of Parts and is well-tested and reliable. The included 6 inch rubber treaded wheels have good traction with the field carpet and the center wheel is 0.14” lower than the front and rear wheels to make it easier for the robot to turn on the spot and make small adjustments when trying to pick up and score game pieces (this is called a “drop center” drive because the center wheel is dropped down slightly).
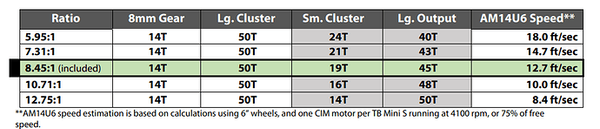
We highly recommend teams buy replacement gears for their drivetrain gearboxes. Based on our initial testing we have found the KitBot’s listed 15ft/s (AndyMark’s User Guide has the provided 8.45:1 listed as 12.7ft/s) is far too hard to control. We recommend 10.71:1 as listed in the table on the bottom of page 3 in the AM14U6 User’s Guide.
This will require two (2x) of the following gears from AndyMark:
Am-4714 1/2 hex steel 48TIf you have any questions please reach out in the Everybot Discord or in the Everybot 2025 Chief Delphi thread.
Chassis Size
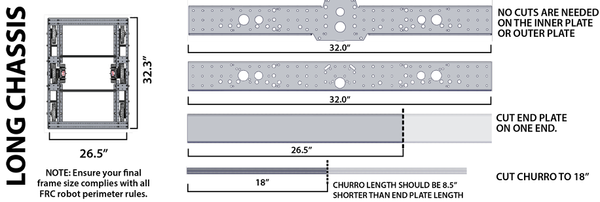
The AndyMark “long” chassis configuration was chosen primarily to retain compatibility with the FIRST KitBot. The long chassis also has plenty of room to mount mechanisms and electronics. Please note that we will not be using the 18” churros in the chassis, so those do not need to be cut at this time. The rest of the robot will be fine if they have already been cut.
Chassis Assembly
Required tools:
-
1/4” socket and ratchet (preferred) or flat blade screwdriver or bit
-
1/2” wrench
-
9/16” wrenches or sockets
-
7/16” or similar size socket
-
3/8” socket or ratchet
-
5/32” allen wrench or t-handle
-
Bandsaw, chop saw or hacksaw
Adjustable wrenches can be used in place of the 9/16” and 1/2” wrenches
A cordless drill and 10-32 tap are optional but can make assembly faster and easier
All required parts for the chassis are from the AndyMark AM14U6 Kit of Parts chassis box except for four CIM (or CIM-replacement) motors. Two CIM motors are included in the standard Kit of Parts, with four additional CIMs included in the Rookie Kit of Parts. The chassis assembly section of the manual refers to Andymark part numbers, so keeping the Andymark manual open to the parts checklist may help you when following this manual.
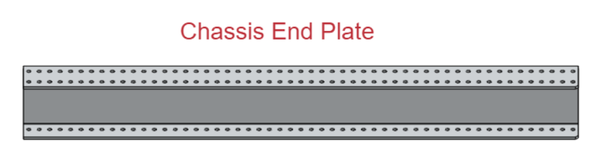
Before beginning to assemble the chassis, the two Chassis End Plates will need to be cut down to 26.5” by removing 4.5” from one end. The churros can be cut down later. If the size of your team allows for it, have someone begin making these cuts while another group begins assembling the wheels. Measure out your cuts and mark them with a combination square to make sure your cuts are perpendicular and cut the plates in a bandsaw or chop saw, making sure to account for the width of your blade. Save the end plate cutoffs for later.