Command Based Programming Introduction
In previous years we had used Timed Based code, which we found to be simpler to understand for beginners. With FIRST’s KitBot using command based code for the past two years and the community overwhelmingly shifting towards command based, we have decided to switch as well. We hope this allows for a smoother experience when getting assistance from other teams and provides an easier experience when integrating other community code projects. If teams feel that this is an unwelcome change or need help adjusting, please reach out in our Discord, we would love to hear from you.
Overview of Command Based Code
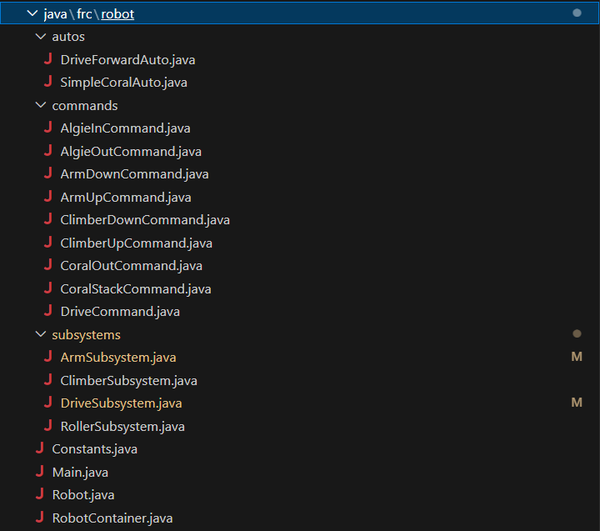
There are 5 components to focus on: Autos folder, Commands folder, Subsystems folder, Constants file and Robot Container file. We will start by looking at how each of these work at a very broad level.
Subsystems
Above is a simplified subsystem, it starts by declaring all the motor controllers required for the subsystem [1], then configures those motor controllers [2] and creates a public method that allows for control of the motor when a speed is fed in [3].
public class ArmSubsystem extends SubsystemBase {
  private final SparkMax armMotor; // <- [1]

  public ArmSubsystem () { // <- [2]
      armMotor = new SparkMax(ArmConstants.ARM_MOTOR_ID, MotorType.kBrushed);

      SparkMaxConfig armConfig = new SparkMaxConfig();
      armConfig.smartCurrentLimit(ArmConstants.ARM_MOTOR_CURRENT_LIMIT);
      armMotor.configure(armConfig, ResetMode.kResetSafeParameters, PersistMode.kPersistParameters);
  }

  public void runArm(double speed){ // <- [3]
      armMotor.set(speed);
  }
}
Commands
That public runArm method from the above arm subsystem will be called by commands. All commands have a similar structure, they take in an instance of a subsystem [1], may do something when starting up or initializing [2], may do something when running [3], may have a command to finish early [4] and will behave some way after the command ends [5]. Here is the ArmUp command which uses the runArm method to power the arm:
public class ArmUpCommand extends Command {
  private final ArmSubsystem m_arm;

  public ArmUpCommand(ArmSubsystem arm) { // <- [1]
    m_arm = arm;
    addRequirements(arm);
  }

  public void initialize() {} // <- [2]

  public void execute() { // <- [3]
    m_arm.runArm(ArmConstants.ARM_SPEED_UP);
  }

  public void end(boolean interrupted) { // <- [5]
    m_arm.runArm(ArmConstants.ARM_HOLD_UP);
  }

  public boolean isFinished() { // <- [4]
    return false;
  }
}
The above ArmUp command takes in the ArmSubsystem, then powers the arm motor at the ARM_SPEED_UP speed while running(executing), then when the command ends it will run the arm motor at the ARM_HOLD_UP speed.
Constants
So the next question becomes what speed is ARM_SPEED_UP, where is that stored? This is where the Constants file comes in. The Constants file contains values that will not change during the operation of the robot while it is on but may need to be changed to get the robot working or improve the performance.
public static final class ArmConstants {
  public static final int ARM_MOTOR_ID = 6;
  public static final int ARM_MOTOR_CURRENT_LIMIT = 60;
  public static final double ARM_MOTOR_VOLTAGE_COMP = 10;
  public static final double ARM_SPEED_DOWN = 0.4;
  public static final double ARM_SPEED_UP = -0.4;
  public static final double ARM_HOLD_DOWN = 0.1;
  public static final double ARM_HOLD_UP = -0.15;
}
We separate the constants into relevant groups, like subsystems or controllers. Above are the ArmConstants, you can see the ARM_SPEED_UP, is -0.4, which translates to -40% output from the motor. There is also other important information here like the CAN_ID of the motor and the amount of current that we can apply to the motor. Now that we have a broad understanding of the building blocks, let's look at how everything comes together in RobotContainer.
Robot Container
In robot container we construct our controllers and subsystems [1], then we will bind controller actions to commands [2]. For instance, WHILE it is TRUE that we are holding the left bumper on the operator controller, then the arm subsystem will be told to power the arm motor up [3]. If you remember the ArmUpCommand, when the command is finished, meaning you are no longer holding the left bumper, then it will continue to hold the arm up but at a lower power.
public class RobotContainer {
  // <- [1]
  private final CommandXboxController m_driverController =
      new CommandXboxController(OperatorConstants.DRIVER_CONTROLLER_PORT);
  private final CommandXboxController m_operatorController =
      new CommandXboxController(OperatorConstants.OPERATOR_CONTROLLER_PORT);


  public final ArmSubsystem m_arm = new ArmSubsystem();
  // <- end of [1]
  public RobotContainer() {
    configureBindings();
  }

  private void configureBindings() { // <- [2]
    m_operatorController.leftBumper().whileTrue(new ArmUpCommand(m_arm)); // <- [3]
    m_operatorController.leftTrigger(.2).whileTrue(new ArmDownCommand(m_arm));
  }
}
Specifics
With this brief overview of the organization let's revisit subsystems, this time with more details. We will start with some commonalities across all of these files, like the imports.
Importing
The package is simply the folder the code is in, starting at frc. Then in order to run the Spark Max you will need to import the relevant code from the REV libraries. Typically you do not have to memorize these imports, if you use a piece of code, then VS Code will do its best to use the correct imports. We also import some stuff from first's WPILIB libraries. Finally things from within your own code such as the DriveConstants can be imported when needed.
package frc.robot.subsystems;

import com.revrobotics.spark.SparkBase.PersistMode;
import com.revrobotics.spark.SparkBase.ResetMode;
import com.revrobotics.spark.SparkLowLevel.MotorType;
import com.revrobotics.spark.SparkMax;
import com.revrobotics.spark.config.SparkMaxConfig;


import edu.wpi.first.wpilibj.drive.DifferentialDrive;
import edu.wpi.first.wpilibj2.command.SubsystemBase;
import frc.robot.Constants.DriveConstants;
Subsystems
Let's tackle something with a bit more going on, like the drive subsystem, here is the whole file, don't worry we will break it down into smaller chunks:
// Copyright (c) FIRST and other WPILib contributors.
// Open Source Software; you can modify and/or share it under the terms of
// the WPILib BSD license file in the root directory of this project.

package frc.robot.subsystems;

import com.revrobotics.spark.SparkBase.PersistMode;
import com.revrobotics.spark.SparkBase.ResetMode;
import com.revrobotics.spark.SparkLowLevel.MotorType;
import com.revrobotics.spark.SparkMax;
import com.revrobotics.spark.config.SparkMaxConfig;


import edu.wpi.first.wpilibj.drive.DifferentialDrive;
import edu.wpi.first.wpilibj2.command.SubsystemBase;
import frc.robot.Constants.DriveConstants;

public class DriveSubsystem extends SubsystemBase {
  private final SparkMax leftLeader;
  private final SparkMax leftFollower;
  private final SparkMax rightLeader;
  private final SparkMax rightFollower;

  private final DifferentialDrive drive;

  /**
   * The subsystem used to drive the robot.
   */
  public DriveSubsystem() {
    // create brushed motors for drive
    leftLeader = new SparkMax(1, MotorType.kBrushed);
    leftFollower = new SparkMax(DriveConstants.LEFT_FOLLOWER_ID, MotorType.kBrushed);
    rightLeader = new SparkMax(3, MotorType.kBrushed);
    rightFollower = new SparkMax(DriveConstants.RIGHT_FOLLOWER_ID, MotorType.kBrushed);

    // set up differential drive class
    drive = new DifferentialDrive(leftLeader, rightLeader);

    // Set can timeout. Because this project only sets parameters once on
    // construction, the timeout can be long without blocking robot operation. Code
    // which sets or gets parameters during operation may need a shorter timeout.
    leftLeader.setCANTimeout(250);
    rightLeader.setCANTimeout(250);
    leftFollower.setCANTimeout(250);
    rightFollower.setCANTimeout(250);

    // Create the configuration to apply to motors. Voltage compensation
    // helps the robot perform more similarly on different
    // battery voltages (at the cost of a little bit of top speed on a fully charged
    // battery). The current limit helps prevent tripping
    // breakers.
    SparkMaxConfig config = new SparkMaxConfig();
    config.voltageCompensation(DriveConstants.DRIVE_MOTOR_VOLTAGE_COMP);
    config.smartCurrentLimit(DriveConstants.DRIVE_MOTOR_CURRENT_LIMIT);

    // Set configuration to follow leader and then apply it to corresponding
    // follower. Resetting in case a new controller is swapped
    // in and persisting in case of a controller reset due to breaker trip
    config.follow(leftLeader);
    leftFollower.configure(config, ResetMode.kResetSafeParameters, PersistMode.kPersistParameters);
    config.follow(rightLeader);
    rightFollower.configure(config, ResetMode.kResetSafeParameters, PersistMode.kPersistParameters);

    // Remove following, then apply config to right leader
    config.disableFollowerMode();
    rightLeader.configure(config, ResetMode.kResetSafeParameters, PersistMode.kPersistParameters);
    // Set conifg to inverted and then apply to left leader. Set Left side inverted
    // so that postive values drive both sides forward
    config.inverted(true);
    leftLeader.configure(config, ResetMode.kResetSafeParameters, PersistMode.kPersistParameters);
  }

  @Override
  public void periodic() {
  }
  /**
   *  Use this to control your drive train, with one axis of the controllering moving the robot
   *  forwards and backwards with the axis turning the robot.
   *
   *  Additionally if squared is true it will square your inputs will be squared,
   *  for instance pushing forwards on the control stick will yield
   *  (0.5 * 0.5) = .25 or 25% power to the drivetrain.
   *
   * @param xSpeed the speed forwards to back
   * @param zRotation the speed to turn at
   * @param squared do you square the inputs from the controller
   */
  public void driveArcade(double xSpeed, double zRotation, boolean squared) {
    drive.arcadeDrive(xSpeed, zRotation, squared);
  }

  /**
   * Use this to drive the robot, with one stick controlling one
   * side of the drivetrain and the other stick on the other.
   *
   * @param leftSpeed speed to drive the left side of the robot at
   * @param rightSpeed speed to drive the right side of the robot at
   * @param squared do you square the inputs from the controller
   */
  public void driveTank(double leftSpeed, double rightSpeed, boolean squared){
    drive.tankDrive(leftSpeed, rightSpeed, squared);
  }
}
Declaring and Initializing Components
Next we will declare what will be used in the subsystem [1] and then decide what information to provide to the subsystem [2] when it is constructed in the RobotContainer.
public class DriveSubsystem extends SubsystemBase {
  private final SparkMax leftLeader; // <- [1]
  private final SparkMax leftFollower;
  private final SparkMax rightLeader;
  private final SparkMax rightFollower;

  private final DifferentialDrive drive;

  public DriveSubsystem() { // <- [2]
    // Stuff is initialized here
  }
}
Above we declared all the SparkMax motor controllers that are required to control the drivebase, as the robot's brain, the roborio, does not directly talk to the motors, it talks to the motor controllers. We will also declare a DifferentialDrive class which when fed the motors used to control our robot will allow for easier control.
public class DriveSubsystem extends SubsystemBase {
  // Everything was initialized here in the last step <- [1]

  public DriveSubsystem() { // <- [2]
    leftLeader = new SparkMax(1, MotorType.kBrushed);
    leftFollower = new SparkMax(DriveConstants.LEFT_FOLLOWER_ID, MotorType.kBrushed);
    rightLeader = new SparkMax(3, MotorType.kBrushed);
    rightFollower = new SparkMax(DriveConstants.RIGHT_FOLLOWER_ID, MotorType.kBrushed);

    // set up differential drive class
    drive = new DifferentialDrive(leftLeader, rightLeader);
  }
}
After the declarations we move into the public DriveTrain() constructor which will be called once when the subsystem is created in the RobotContainer. When constructed we need to make sure that the subsystem is setup correctly, so we will configure the motor controllers and anything else we declared above. We start by constructing the motor controllers, which require the CAN ID that was set via the REV hardware client and the type of motor being used. If you hover your mouse over the SparkMax constructor, you can see what it asks for and the it wants it. For the DifferentialDrive we designate one motor from each side as a leader and the others will be followers.

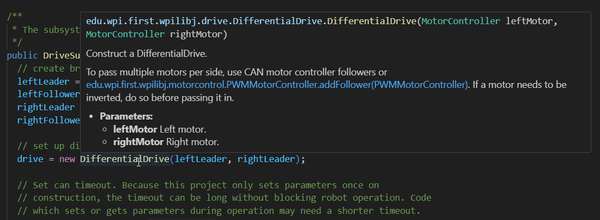
The Everybot uses CIMs in its default configuration which are brushed motors, the other CIMs on the robot will also be brushed (kBrushed) however the NEO motor on the climb is a brushless motor (kBrushless). After we have constructed our motor controllers and differential drive we will need to configure them.
Configuration
public DriveSubsystem() {
  drive = new DifferentialDrive(leftLeader, rightLeader); // <- we left off here

  SparkMaxConfig config = new SparkMaxConfig(); // [1]
  config.voltageCompensation(DriveConstants.DRIVE_MOTOR_VOLTAGE_COMP); // [2]
  config.smartCurrentLimit(DriveConstants.DRIVE_MOTOR_CURRENT_LIMIT); // [2]

  config.follow(leftLeader); // [3] left leader is selected to follow
  leftFollower.configure(config, ResetMode.kResetSafeParameters, PersistMode.kPersistParameters); // [3] configuration is applied, with voltage comp and current limit
  config.follow(rightLeader); // [3] right leader is selected, overriding the last leader
  rightFollower.configure(config, ResetMode.kResetSafeParameters, PersistMode.kPersistParameters); // [3] config applied

  config.disableFollowerMode(); // [4] follower mode disabled for leader motor configuration
  rightLeader.configure(config, ResetMode.kResetSafeParameters, PersistMode.kPersistParameters);
  config.inverted(true); // [5] other leader is inverted, to ensure both go forward with positive power
  leftLeader.configure(config, ResetMode.kResetSafeParameters, PersistMode.kPersistParameters);
}
Now that the motor controllers have been initialized, we will configure the motors. We will create a SparkMax configuration object and then start by feeding some basic configuration parameters that are used across all the drive motors [1]. We setup the voltage compensation which basically governs how much voltage we can put into the motor and the current limit which determines how many amps we can put into a motor [2]. We will then configure the follower motors to follow their lead motors and apply the configuration to the motor [3]. After the follower motors are configured we will apply the default configuration to one side of the drivetrain [4] and invert the direction of the opposite side [5], then configure. We need to invert one side to ensure that the motors spin the same direction when given positive input, as one is facing the opposite direction.
Creating Public Methods
As some brief housekeeping, there is the periodic function, this will be called every time the robot issues commands to everything, which is every 20ms. While we do not use it, it is left in.
  @Override
  public void periodic() {
  }
  /**
   *  Use this to control your drive train, with one axis of the controller moving the robot
   *  forwards and backwards with the axis turning the robot.
   *
   *  Additionally if squared is true it will square your inputs will be squared,
   *  for instance pushing forwards on the control stick will yield
   *  (0.5 * 0.5) = .25 or 25% power to the drivetrain.
   *
   * @param xSpeed the speed forwards to back
   * @param zRotation the speed to turn at
   * @param squared do you square the inputs from the controller
   */
  public void driveArcade(double xSpeed, double zRotation, boolean squared) {
    drive.arcadeDrive(xSpeed, zRotation, squared);
  }

  /**
   * Use this to drive the robot, with one stick controlling one
   * side of the drivetrain and the other stick on the other.
   *
   * @param leftSpeed speed to drive the left side of the robot at
   * @param rightSpeed speed to drive the right side of the robot at
   * @param squared do you square the inputs from the controller
   */
  public void driveTank(double leftSpeed, double rightSpeed, boolean squared){
    drive.tankDrive(leftSpeed, rightSpeed, squared);
  }
Lastly in this subsystem there are two different public functions that can control the drivetrain, one which uses arcadeDrive and the other uses tankDrive. Both of these will require two inputs for a controller and have a true or false boolean field, which asks if the inputs should be squared, which is explained in the comments. You may have noticed the green text in all the code, which starts with //, the differences between tank and arcade are explained in the comments of the code.
Commands
There are many different philosophies on how to best structure commands. There is no reason to exactly follow how we organize our commands but we highly recommend that all commands are organized in the same way. For the Everybot, we wanted to make each command incredibly specific, it does exactly one thing and nothing more. This works great for a robot of this complexity but may become a bit annoying as the number of motors and sensors on the robot increases.
If you wish to simplify things, for example all of the roller commands are identical, except during the execute portion, where each one feeds in a specific motor speed. When the command is called, you could also pass in a speed, which would cut the number of Roller commands from 4 to 1.
With that brief explanation over, let's look at a command in full, specifically the drive command.
// Copyright (c) FIRST and other WPILib contributors.
// Open Source Software; you can modify and/or share it under the terms of
// the WPILib BSD license file in the root directory of this project.

package frc.robot.commands;

import edu.wpi.first.wpilibj2.command.Command;
import frc.robot.subsystems.DriveSubsystem;

import java.util.function.BooleanSupplier;
import java.util.function.DoubleSupplier;

// Command to drive the robot with joystick inputs
public class DriveCommand extends Command {
  private final DoubleSupplier m_xSpeed;
  private final DoubleSupplier m_zRotation;
  private final DriveSubsystem m_drive;
  private final BooleanSupplier m_squared;

  /**
   * Used to drive the robot, uses arcade drive by default, you will need to modify
   * this command to use tank if desired.
   *
   * @param driveSubsystem
   * @param xSpeed The speed forwards and backwards
   * @param zRotation The speed to turn the drivetrain at
   * @param squareInputs Square the inputs from the controller
   */
  public DriveCommand(DriveSubsystem driveSubsystem,
      DoubleSupplier xSpeed, DoubleSupplier zRotation, BooleanSupplier squareInputs) {
    // Save parameters to local variables for use later
    m_xSpeed = xSpeed;
    m_zRotation = zRotation;
    m_drive = driveSubsystem;
    m_squared = squareInputs;

    // Declare subsystems required by this command. This should include any
    // subsystem this command sets and output of
    addRequirements(m_drive);
  }

  // Runs each time the command is scheduled.
  @Override
  public void initialize() {
  }

  // Runs every cycle while the command is scheduled (~50 times per second)
  // In teleop we square the drive command to help improve handling, play
  // around with it off, this is driver preference
  @Override
  public void execute() {
    m_drive.driveArcade(m_xSpeed.getAsDouble(), m_zRotation.getAsDouble(), m_squared.getAsBoolean());
  }

  // Runs each time the command ends via isFinished or being interrupted.
  @Override
  public void end(boolean isInterrupted) {
  }

  // Runs every cycle while the command is scheduled to check if the command is
  // finished
  @Override
  public boolean isFinished() {
    // Return false to indicate that this command never ends. It can be interrupted
    // by another command needing the same subsystem.
    return false;
  }
}
Declarations and Initializing
This will start very similarly to a Subsystems, we will declare everything that we want to use. Here we will ask for a double to be supplied via a double supplier. The supplier portion allows the value supplied from the robot container to change as the joysticks are moved, the double portion is the type of value, in this case it is a decimal number. This will needed for both the speed in the x direction and a speed to rotate at about the z axis. It also asks for a true or false boolean to be supplied, to figure out whether or not to square the inputs fed to the drive. Finally we ask for a drive subsystem, please note that only one drive can exist at once, so we will need to pass it in from the robot container in the next step.
public class DriveCommand extends Command {
  private final DoubleSupplier m_xSpeed;
  private final DoubleSupplier m_zRotation;
  private final DriveSubsystem m_drive;
  private final BooleanSupplier m_squared;

  // More stuff below
}
Here in the setup of the command, we accept the variable suppliers and the singular instance of the DriveSubsystem that was declared in the robot container [1]. Then we set our local variables to the instance of the suppliers and the drive subsystem [2]. Finally we add the drive as a requirement, this ensures that it cannot be called by another command [3]. You can't set a motor to two different values at the same time, so this prevents that from happening.
public class DriveCommand extends Command {
  //declarations happened here

  public DriveCommand(DriveSubsystem driveSubsystem, DoubleSupplier xSpeed,
   DoubleSupplier zRotation, BooleanSupplier squareInputs) { // [1]
    // Save parameters to local variables for use later
    m_xSpeed = xSpeed; // [2]
    m_zRotation = zRotation;
    m_drive = driveSubsystem;
    m_squared = squareInputs;

    // Declare subsystems required by this command. This should include any
    // subsystem this command sets uses
    addRequirements(m_drive); // [3]
  }
}
Initialization and Execution
We will start with the initialization of the command which is run before the command starts to execute [1]. This is left blank across most of our commands but it can be used for things like starting timers. Then the execute function will run about every 20ms or 50 time per second [2]. Here we use this to run the drive command with the xSpeed and zRotation supplied by the controller's current state. This could be replaced by driveTank for tank controls, please note that you may want to use different sticks to supply the input. If you want to quickly switch between trying tank and arcade, it may be better to create a command specific to using arcade and a command specific to using tank.
// Runs each time the command is scheduled.
  @Override
  public void initialize() { // [1]
  }

  @Override
  public void execute() { // [2]
    m_drive.driveArcade(m_xSpeed.getAsDouble(), m_zRotation.getAsDouble(), m_squared.getAsBoolean());
  }
End and IsFinishing
Finally we need to decide how a command know when it is finished and what to do when it ends, here we will move away from what is in drive subsystem for a better example. end determines the behavior of the system when it stops running, for instance in the case of our arm, we applied a low amount of power to hold the arm up when the command ended [1]. end() will be called however the command ends, like letting go of a button or having isFinished return true. Below is an example, if the value of the timer is higher than the end time, then isFinished will be true and the command will stop running[2].
  // This is not code that actually appears in the driveCommand, it is just for example
  @Override
  public void end(boolean isInterrupted) { // [1]
    m_arm.runArm(ArmConstants.ARM_SPEED_DOWN);
  }

  @Override
  public boolean isFinished() {
    if( timer.get() >= end_time)
    {
      return true;
    }
    return false;
  }
Robot Container
Finally returning to robot container, we will look at how all the subsystems work and then cover autos.
// Copyright (c) FIRST and other WPILib contributors.
// Open Source Software; you can modify and/or share it under the terms of
// the WPILib BSD license file in the root directory of this project.

package frc.robot;

import frc.robot.Constants.DriveConstants;
import frc.robot.Constants.OperatorConstants;
import frc.robot.autos.DriveForwardAuto;
import frc.robot.autos.SimpleCoralAuto;
import frc.robot.commands.AlgieInCommand;
import frc.robot.commands.AlgieOutCommand;
import frc.robot.commands.ArmDownCommand;
import frc.robot.commands.ArmUpCommand;
import frc.robot.commands.ClimberDownCommand;
import frc.robot.commands.ClimberUpCommand;
import frc.robot.commands.CoralOutCommand;
import frc.robot.commands.CoralStackCommand;
import frc.robot.commands.DriveCommand;
import frc.robot.subsystems.ArmSubsystem;
import frc.robot.subsystems.ClimberSubsystem;
import frc.robot.subsystems.DriveSubsystem;
import frc.robot.subsystems.RollerSubsystem;
import edu.wpi.first.wpilibj.smartdashboard.SendableChooser;
import edu.wpi.first.wpilibj.smartdashboard.SmartDashboard;
import edu.wpi.first.wpilibj2.command.Command;
import edu.wpi.first.wpilibj2.command.button.CommandXboxController;
import edu.wpi.first.wpilibj2.command.button.Trigger;

/**
 * This class is where the bulk of the robot should be declared. Since Command-based is a
 * "declarative" paradigm, very little robot logic should actually be handled in the {@link Robot}
 * periodic methods (other than the scheduler calls). Instead, the structure of the robot (including
 * subsystems, commands, and trigger mappings) should be declared here.
 */
public class RobotContainer {

  // The robot's subsystems and commands are defined here...
  // Replace with CommandPS4Controller or CommandJoystick if needed
  private final CommandXboxController m_driverController =
      new CommandXboxController(OperatorConstants.DRIVER_CONTROLLER_PORT);
  // You can remove this if you wish to have a single driver, note that you
  // may have to change the binding for left bumper.
  private final CommandXboxController m_operatorController =
      new CommandXboxController(OperatorConstants.OPERATOR_CONTROLLER_PORT);

  // The autonomous chooser
  SendableChooser<Command> m_chooser = new SendableChooser<>();

  public final RollerSubsystem m_roller = new RollerSubsystem();
  public final ArmSubsystem m_arm = new ArmSubsystem();
  public final DriveSubsystem m_drive = new DriveSubsystem();
  public final ClimberSubsystem m_climber = new ClimberSubsystem();

  public final SimpleCoralAuto m_simpleCoralAuto = new SimpleCoralAuto(m_drive, m_roller, m_arm);
  public final DriveForwardAuto m_driveForwardAuto = new DriveForwardAuto(m_drive);

  /** The container for the robot. Contains subsystems, OI devices, and commands. */
  public RobotContainer() {
    // Set up command bindings
    configureBindings();
    // Set the options to show up in the Dashboard for selecting auto modes. If you
    // add additional auto modes you can add additional lines here with
    // autoChooser.addOption
    m_chooser.setDefaultOption("Coral Auto", m_simpleCoralAuto);
    m_chooser.addOption("Drive Forward Auto", m_driveForwardAuto);
    SmartDashboard.putData(m_chooser);
  }

  /**
   * Use this method to define your trigger->command mappings. Triggers can be created via the
   * {@link Trigger#Trigger(java.util.function.BooleanSupplier)} constructor with an arbitrary
   * predicate, or via the named factories in {@link
   * edu.wpi.first.wpilibj2.command.button.CommandGenericHID}'s subclasses for {@link
   * CommandXboxController Xbox}/{@link edu.wpi.first.wpilibj2.command.button.CommandPS4Controller
   * PS4} controllers or {@link edu.wpi.first.wpilibj2.command.button.CommandJoystick Flight
   * joysticks}.
   */
  private void configureBindings() {

    /**
     * Set the default command for the drive subsystem to an instance of the
     * DriveCommand with the values provided by the joystick axes on the driver
     * controller. The Y axis of the controller is inverted so that pushing the
     * stick away from you (a negative value) drives the robot forwards (a positive
     * value). Similarly for the X axis where we need to flip the value so the
     * joystick matches the WPILib convention of counter-clockwise positive
     */
    m_drive.setDefaultCommand(new DriveCommand(m_drive,
        () -> -m_driverController.getLeftY(),
        () -> -m_driverController.getRightX(),
        () -> true));

    /**
     * Holding the left bumper (or whatever button you assign) will multiply the speed
     * by a decimal to limit the max speed of the robot ->
     * 1 (100%) from the controller * .9 = 90% of the max speed when held (we also square it)
     *
     * Slow mode is very valuable for line ups and the deep climb
     *
     * When switching to single driver mode switch to the B button
     */
    m_driverController.leftBumper().whileTrue(new DriveCommand(m_drive,
        () -> -m_driverController.getLeftY() * DriveConstants.SLOW_MODE_MOVE,
        () -> -m_driverController.getRightX() * DriveConstants.SLOW_MODE_TURN,
        () -> true));

    /**
     * Here we declare all of our operator commands, these commands could have been
     * written more compact but are left verbose so the intent is clear.
     */
    m_operatorController.rightBumper().whileTrue(new AlgieInCommand(m_roller));

    // Here we use a trigger as a button when it is pushed past a certain threshold
    m_operatorController.rightTrigger(.2).whileTrue(new AlgieOutCommand(m_roller));

    /**
     * The arm will be passively held up or down after this is used,
     * make sure not to run the arm too long or it may get upset!
     */
    m_operatorController.leftBumper().whileTrue(new ArmUpCommand(m_arm));
    m_operatorController.leftTrigger(.2).whileTrue(new ArmDownCommand(m_arm));

    /**
     * Used to score coral, the stack command is for when there is already coral
     * in L1 where you are trying to score. The numbers may need to be tuned,
     * make sure the rollers do not wear on the plastic basket.
     */
    m_operatorController.x().whileTrue(new CoralOutCommand(m_roller));
    m_operatorController.y().whileTrue(new CoralStackCommand(m_roller));

    /**
     * POV is a direction on the D-Pad or directional arrow pad of the controller,
     * the direction of this will be different depending on how your winch is wound
     */
    m_operatorController.pov(0).whileTrue(new ClimberUpCommand(m_climber));
    m_operatorController.pov(180).whileTrue(new ClimberDownCommand(m_climber));
  }

  /**
   * Use this to pass the autonomous command to the main {@link Robot} class.
   *
   * @return the command to run in autonomous
   */
    public Command getAutonomousCommand() {
    // An example command will be run in autonomous
    return m_chooser.getSelected();
  }
}
Starting Robot Container
First we start setting up the controllers that we will be using. You can choose to use two or one if you use a single controller it will require some minor button mappings [1]. Then we will set up something that will allow us to choose our autonomous modes in the SendableChooser [2]. Finally we will initialize all of our subsystems, this will only be done once [3].
public class RobotContainer {

  // The robot's subsystems and commands are defined here...
  // Replace with CommandPS4Controller or CommandJoystick if needed
  private final CommandXboxController m_driverController =
      new CommandXboxController(OperatorConstants.DRIVER_CONTROLLER_PORT); // [1]
  // You can remove this if you wish to have a single driver, note that you
  // may have to change the binding for left bumper.
  private final CommandXboxController m_operatorController =
      new CommandXboxController(OperatorConstants.OPERATOR_CONTROLLER_PORT);

  // The autonomous chooser
  SendableChooser<Command> m_chooser = new SendableChooser<>(); // [2]

  public final RollerSubsystem m_roller = new RollerSubsystem(); // [3]
  public final ArmSubsystem m_arm = new ArmSubsystem();
  public final DriveSubsystem m_drive = new DriveSubsystem();
  public final ClimberSubsystem m_climber = new ClimberSubsystem();
}
Setting up Autos
Next we will initialize all of the autos, making sure to feed in the correct subsystem instances [1]. Then we will configure the button bindings, which calls a function that will be explored in a bit [2]. Then we will provide our autos to the sendable chooser, with the string (text) that will be output to your dashboard [3]. Then the data will be sent to the SmartDashboard [4]. Finally we create a function that will return the autonomous command to be used in Robot.java [5] (which we will not be covering).
  public final SimpleCoralAuto m_simpleCoralAuto = new SimpleCoralAuto(m_drive, m_roller, m_arm); // [1]
  public final DriveForwardAuto m_driveForwardAuto = new DriveForwardAuto(m_drive);

  /** The container for the robot. Contains subsystems, OI devices, and commands. */
  public RobotContainer() {
    // Set up command bindings
    configureBindings(); // [2]
    // Set the options to show up in the Dashboard for selecting auto modes. If you
    // add additional auto modes you can add additional lines here with
    // autoChooser.addOption
    m_chooser.setDefaultOption("Coral Auto", m_simpleCoralAuto); // [3]
    m_chooser.addOption("Drive Forward Auto", m_driveForwardAuto);
    SmartDashboard.putData(m_chooser); // [4]
  }

  public Command getAutonomousCommand() {
    return m_chooser.getSelected(); // [5]
  }
Configuring the button bindings
In order for the robot to drive we need to map the commands to buttons on the controllers. First we will setup a default command for the drivebase, to ensure that the command is always active [1]. This will ensure that whenever the sticks on the controllers are moved, then the robot always moves. When the left bumper on the driver controller the robot will drive at a significantly lower speed [2]. The command works WHILE it is TRUE that the chosen button is held, then the behavior will return to normal. Finally all the controls are either true while a button is being held [3] or while one of the rear triggers is held down over the threshold [4].
private void configureBindings() {

    /**
     * Set the default command for the drive subsystem to an instance of the
     * DriveCommand with the values provided by the joystick axes on the driver
     * controller. The Y axis of the controller is inverted so that pushing the
     * stick away from you (a negative value) drives the robot forwards (a positive
     * value). Similarly for the X axis where we need to flip the value so the
     * joystick matches the WPILib convention of counter-clockwise positive
     */
    m_drive.setDefaultCommand(new DriveCommand(m_drive, // [1]
        () -> -m_driverController.getLeftY(),
        () -> -m_driverController.getRightX(),
        () -> true));

    /**
     * Holding the left bumper (or whatever button you assign) will multiply the speed
     * by a decimal to limit the max speed of the robot ->
     * 1 (100%) from the controller * .9 = 90% of the max speed when held (we also square it)
     *
     * Slow mode is very valuable for line ups and the deep climb
     *
     * When switching to single driver mode switch to the B button
     */
    m_driverController.leftBumper().whileTrue(new DriveCommand(m_drive, // [2]
        () -> -m_driverController.getLeftY() * DriveConstants.SLOW_MODE_MOVE,
        () -> -m_driverController.getRightX() * DriveConstants.SLOW_MODE_TURN,
        () -> true));

    /**
     * Here we declare all of our operator commands, these commands could have been
     * written more compact but are left verbose so the intent is clear.
     */
    m_operatorController.rightBumper().whileTrue(new AlgieInCommand(m_roller)); // [3]

    // Here we use a trigger as a button when it is pushed past a certain threshold
    m_operatorController.rightTrigger(.2).whileTrue(
      new AlgieOutCommand(m_roller)); // [4]

    /**
     * The arm will be passively held up or down after this is used,
     * make sure not to run the arm too long or it may get upset!
     */
    m_operatorController.leftBumper().whileTrue(new ArmUpCommand(m_arm));
    m_operatorController.leftTrigger(.2).whileTrue(new ArmDownCommand(m_arm));

    /**
     * Used to score coral, the stack command is for when there is already coral
     * in L1 where you are trying to score. The numbers may need to be tuned,
     * make sure the rollers do not wear on the plastic basket.
     */
    m_operatorController.x().whileTrue(new CoralOutCommand(m_roller));
    m_operatorController.y().whileTrue(new CoralStackCommand(m_roller));

    /**
     * POV is a direction on the D-Pad or directional arrow pad of the controller,
     * the direction of this will be different depending on how your winch is wound
     */
    m_operatorController.pov(0).whileTrue(new ClimberUpCommand(m_climber));
    m_operatorController.pov(180).whileTrue(new ClimberDownCommand(m_climber));
  }
Autonomous
For this structure autonomous commands are regular commands with extra steps. The key difference is that our autos will also call existing commands and use timers to ensure actions are not performed longer than needed.
package frc.robot.autos;

import edu.wpi.first.wpilibj.Timer;
import edu.wpi.first.wpilibj2.command.Command;
import frc.robot.Constants.ArmConstants;
import frc.robot.Constants.RollerConstants;
import frc.robot.subsystems.ArmSubsystem;
import frc.robot.subsystems.DriveSubsystem;
import frc.robot.subsystems.RollerSubsystem;

public class SimpleCoralAuto extends Command {
    private DriveSubsystem m_drive;
    private RollerSubsystem m_roller;
    private ArmSubsystem m_arm;
    private Timer timer;
    private double drive_seconds = 3.25;
    private double exjest_seconds = 4.5;

    /**
     * This auto will have the robot drive forwards, stop then drop the coral into L1
     *
     * There are many ways to write autos, this form will work well for most simple
     * auto routines. For more advanced routines you may want a different structure and
     * to use more sensors.
     *
     * Here we use two timer gates, after the robot has finished driving for the first 3.25
     * seconds, it will exjest the coral for 4.5-3.25 = 1.25 seconds.
     *
     *
     * @param drive
     * @param roller
     * @param arm
     */
    public SimpleCoralAuto(DriveSubsystem drive, RollerSubsystem roller, ArmSubsystem arm)
    {
        m_drive = drive;
        m_roller = roller;
        m_arm = arm;

        timer = new Timer();

        addRequirements(m_drive);
        addRequirements(m_roller);
        addRequirements(m_arm);
    }

    @Override
  public void initialize() {
    // start timer, uses restart to clear the timer as well in case this command has
    // already been run before
    timer.restart();
  }

  // Runs every cycle while the command is scheduled (~50 times per second)
  @Override
  public void execute() {
    /**
     * We always want to hold the arm up duirng the auto to ensure the rollers
     */
    m_arm.runArm(ArmConstants.ARM_HOLD_UP);

    /**
     * While this timer is less than drive_seconds, the robot will obey the command inside
     */
    if(timer.get() < drive_seconds)
    {
        m_drive.driveArcade(0.3, 0.0,false);
    }
    /**
     * Once the timer is greater than drive_seconds but less than exjest seconds,
     * the code inside will run, here we stop the drivetrain and exjest the coral.
     */
    else if(timer.get() > drive_seconds && timer.get() < exjest_seconds)
    {
        m_drive.driveArcade(0.0, 0.0,false);
        m_roller.runRoller(RollerConstants.ROLLER_CORAL_OUT);
    }
  }

  // Runs each time the command ends via isFinished or being interrupted.
  @Override
  public void end(boolean isInterrupted) {
    // stop drive motors
    m_drive.driveArcade(0.0, 0.0, false);
    m_roller.runRoller(0);
    timer.stop();
  }

  // Runs every cycle while the command is scheduled to check if the command is
  // finished
  @Override
  public boolean isFinished() {
    // check if timer exceeds seconds, when it has this will return true indicating
    // this command is finished
    return timer.get() >= exjest_seconds;
  }
}
The Timer
Like previous commands we will need to declare all the subsystems we are using but here we all declare a timer [1] and use two variables as time gates [2]. Everything is the same on setup as a command, we just need to construct the timer [3]. Finally when the command is initialized or started, we will reset the timer, which ensures that it starts running at time = 0 seconds [4].
public class SimpleCoralAuto extends Command {
  private DriveSubsystem m_drive;
  private RollerSubsystem m_roller;
  private ArmSubsystem m_arm;
  private Timer timer; // [1]
  private double drive_seconds = 3.25; // [2]
  private double exjest_seconds = 4.5;

  /**
   * This auto will have the robot drive forwards, stop then drop the coral into L1
   *
   * There are many ways to write autos, this form will work well for most simple
   * auto routines. For more advanced routines you may want a different structure and
   * to use more sensors.
   *
   * Here we use two timer gates, after the robot has finished driving for the first 3.25
   * seconds, it will exjest the coral for 4.5-3.25 = 1.25 seconds.
   *
   *
   * @param drive
   * @param roller
   * @param arm
   */
  public SimpleCoralAuto(DriveSubsystem drive, RollerSubsystem roller, ArmSubsystem arm)
  {
      m_drive = drive;
      m_roller = roller;
      m_arm = arm;

      timer = new Timer(); // [3]

      addRequirements(m_drive);
      addRequirements(m_roller);
      addRequirements(m_arm);
  }

  @Override
  public void initialize() {
    // start timer, uses restart to clear the timer as well in case this command has
    // already been run before
    timer.restart(); // [4]
  }
}
Using the Timer and Executing Auto
We start the execute portion, which runs about every 20ms, by ensuring that the arm will stay up during the autonomous by running it at the low ARM_HOLD_UP speed [1].
Then we ask the question: is the timer, which reports the time passed since the timer was started, less than (<) drive_seconds. IF the time passed IS NOT GREATER THAN OR EQUAL TO than drive_seconds, then the robot will drive forwards at .3 or 30% power [2]. ELSE IF the time is GREATER THAN (>) drive_seconds AND (&&) the timer is LESS THAN (<) exjest_seconds then it make sure the drivetrain stays still and exjests the coral [3].
Once the timer is GREATER THAN OR EQUAL TO (>=) exjest_seconds, then the auto will end [4] and ensure that everything is stopped, except the passive arm holding up, as there is no reason to stop it [5].
@Override
  public void execute() {
    /**
     * We always want to hold the arm up duirng the auto to ensure the rollers
     */
    m_arm.runArm(ArmConstants.ARM_HOLD_UP); // [1]

    /**
     * While this timer is less than drive_seconds, the robot will obey the command inside
     */
    if(timer.get() < drive_seconds) // [2]
    {
      m_drive.driveArcade(0.3, 0.0,false);
    }
    /**
     * Once the timer is greater than drive_seconds but less than exjest seconds,
     * the code inside will run, here we stop the drivetrain and exjest the coral.
     */
    else if(timer.get() > drive_seconds && timer.get() < exjest_seconds) // [3]
    {
      m_drive.driveArcade(0.0, 0.0,false);
      m_roller.runRoller(RollerConstants.ROLLER_CORAL_OUT);
    }
  }

  // Runs each time the command ends via isFinished or being interrupted.
  @Override
  public void end(boolean isInterrupted) { // [5]
    // stop drive motors
    m_drive.driveArcade(0.0, 0.0, false);
    m_roller.runRoller(0);
    timer.stop();
  }

  // Runs every cycle while the command is scheduled to check if the command is
  // finished
  @Override
  public boolean isFinished() { // [4]
    // check if timer exceeds seconds, when it has this will return true indicating
    // this command is finished
    return timer.get() >= exjest_seconds;
  }